In modern software development, graphics processing units (GPUs) are essential for machine learning, data analytics, and high-performance computing. They bring unparalleled processing power, but making the most of them can be tricky, especially in containerized environments. The good news is that Docker has made it easier than ever to integrate GPUs into container workflows. In this guide, we’ll cover how to use GPUs with Docker effectively, discuss key considerations, and provide step-by-step instructions for enabling GPU support in Docker. We’ll also highlight how DevZero helps optimize GPU resource management to reduce costs and enhance performance.
What Is a GPU?
A graphics processing unit is a specialized processor designed to handle intensive parallel computing tasks. Initially built for rendering graphics, GPUs are now widely used in fields like artificial intelligence (AI), machine learning (ML), scientific simulations, data analytics, and video processing. Their ability to perform many calculations simultaneously makes them invaluable for accelerating workloads that would otherwise overwhelm CPUs.
GPU vs. CPU: Why GPUs Matter
Unlike CPUs, which are optimized for sequential processing, GPUs are designed for parallelism. This makes them particularly effective for tasks such as training deep learning models, rendering 3D images, and running simulations. With thousands of cores, GPUs can handle numerous threads at once, drastically reducing the time it takes to complete computational tasks. For example, training a deep learning model that might take days on a CPU can be completed within hours using a GPU.
What Is Docker?
Docker is an open-source platform that allows developers to build, deploy, and manage applications inside lightweight, portable containers. Containers are isolated environments that include everything an application needs to run, from code and runtime to system tools and libraries. By containerizing applications, developers can maintain consistency across different environments, whether running locally, in the cloud, or on premises.
When combining GPUs and Docker, you get the best of both tools: the computational power of GPUs and the flexibility of containerized workflows. However, enabling GPU support in Docker requires specific configurations, which we’ll cover in detail.

How to Enable GPU in Docker
Enabling GPU support in Docker requires configuring both your hardware and software environment. Below, we’ll address key questions and provide practical, step-by-step instructions.
Availability of GPU Support in Docker Desktop
GPU support in Docker Desktop is available for both Windows and Linux platforms. On Windows, Docker Desktop leverages the Windows Subsystem for Linux 2 (WSL 2) to provide GPU access. On Linux, the NVIDIA Container Toolkit enables seamless GPU integration. macOS currently does not support GPU acceleration in Docker, so developers using macOS must rely on remote machines or cloud-based solutions for GPU workloads.
Docker Desktop for Windows Support
Docker Desktop for Windows supports GPU acceleration through WSL 2. This feature allows Windows users to run Linux containers with GPU access if their system meets the hardware and software prerequisites. Additionally, the use of WSL 2 enables Linux-based workloads to run natively on Windows, taking full advantage of GPU resources.
Steps to Enable GPU on Docker
Step 1: Check hardware requirements
Before enabling GPU support in Docker, your system must meet the following requirements:
- Operating system: Linux (Ubuntu, Debian, CentOS, etc.) or Windows 10/11 with WSL 2 enabled.
- GPU requirements:
- NVIDIA GPU: A compatible NVIDIA GPU with CUDA support. Verify that your system has an NVIDIA GPU with CUDA support. NVIDIA GPUs are the only ones supported natively by Docker for GPU workloads. Check your GPU model against the NVIDIA CUDA GPUs list.
- AMD GPU: Alternative setups (e.g., ROCm) are required.
- NVIDIA drivers: Download and install the latest NVIDIA drivers for your GPU. Running outdated drivers may cause compatibility issues.
Step 2: Install Docker Desktop
- Download Docker Desktop: Get the latest version of Docker Desktop from the official website. Docker 19.03 or later is required for native GPU support via the NVIDIA Container Toolkit.
- Install Docker Desktop: Follow the installation wizard to set up Docker Desktop on your machine.
- Enable WSL 2 integration: During the installation, enable WSL 2 integration.
Step 3: Enable WSL 2 GPU paravirtualization (Windows only)
- Install WSL 2: Run the following command to install WSL 2:
wsl --install
Install Linux kernel update: Download the latest version of the WSL 2 Linux kernel from Microsoft’s official site.
- Update NVIDIA drivers: Update your NVIDIA drivers to the latest version to support GPU paravirtualization. Check driver compatibility with the CUDA version you plan to use.
Enable GPU support: Add the following line to your .wslconfig file to enable GPU access:
[wsl2]
gpu=true
- Restart WSL: Run wsl --shutdown and then reopen your WSL environment.
Step 4: Install NVIDIA Container Toolkit
- Add NVIDIA repository: Run the following commands to add NVIDIA's package repository:
distribution=$(. /etc/os-release; echo $ID$VERSION_ID) \
&& curl -s -L https://nvidia.github.io/nvidia-docker/gpgkey | sudo apt-key add - \
&& curl -s -L https://nvidia.github.io/nvidia-docker/$distribution/nvidia-docker.list | sudo tee /etc/apt/sources.list.d/nvidia-docker.list
2. Install the toolkit:
sudo apt-get update && sudo apt-get install -y nvidia-container-toolkit
3. Restart Docker:
sudo systemctl restart docker
Step 5: Validate GPU Setup
- Run a validation command:
docker run --rm --gpus all nvidia/cuda:11.0-base nvidia-smi
This command checks whether Docker can detect and utilize your GPU.
Step 6: Running containers with GPU support
At this stage, you can proceed with developing your application. The example below uses the NVIDIA Container Toolkit to support experimental deep-learning frameworks. A fully constructed Dockerfile might be written as follows, with /app/ containing all the Python files:
# Use NVIDIA CUDA base image
FROM nvidia/cuda:12.6.2-devel-ubuntu22.04
CMD nvidia-smi

# Set non-interactive mode to avoid prompts during installation
ENV DEBIAN_FRONTEND=noninteractive

# Install required packages in a single RUN command to reduce image layers
RUN apt-get update && apt-get install --no-install-recommends -y \
curl unzip python3 python3-pip && \
apt-get clean && rm -rf /var/lib/apt/lists/*

# Set up working directory
WORKDIR /app

# Copy requirements file first to leverage Docker's caching mechanism
COPY app/requirements_verbose.txt .

# Install dependencies
RUN pip3 install --no-cache-dir -r requirements_verbose.txt

# Copy the rest of the application
COPY app/ .

# Set environment variables
ENV NUM_EPOCHS=10 \
MODEL_TYPE=EfficientDet \
DATASET_LINK=HIDDEN \
TRAIN_TIME_SEC=100

# Run the training script
CMD ["python3", "train_and_eval.py"]
Build the image with the following command:
docker build . -t <your-image-name>
You can run the container from the image by using this command:
docker run --gpus all <your-image-name>
You need to use the --gpus all flag or the GPU will not be exposed to the running container.
After running the commands, it allocates all available GPU resources to the container.
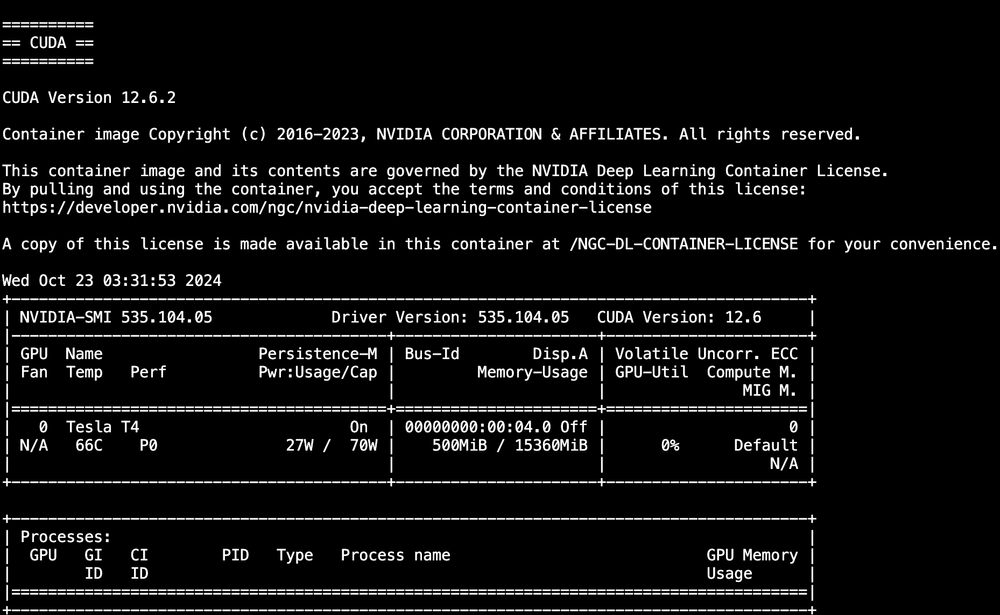
The output should look like this:

The Docker container above trains and evaluates a deep learning model according to the given specifications and using the GPU of the host machine.
For more granular control, specify the number of GPUs:
docker run --gpus "device=0" your-image-name
Step 7: Benchmark GPU performance
To validate GPU performance, execute a simple benchmark:
1. Pull a CUDA-enabled Docker image:
docker pull nvidia/cuda:11.0-base
2. Run a benchmark inside the container:
docker run --gpus all nvidia/cuda:11.0-base bash -c "cd /usr/local/cuda/samples/1_Utilities/deviceQuery && make && ./deviceQuery"
This provides a summary of your GPU’s performance metrics.
Role of NVIDIA GPU in Docker Desktop for Windows
NVIDIA GPUs play a crucial role in enabling GPU acceleration in Docker Desktop for Windows. They provide the hardware interface required for GPU-intensive containerized applications. GPU support through WSL 2 enables the seamless execution of Linux-based workloads that require high computational power. Without an NVIDIA GPU, many machine learning frameworks and scientific libraries would fail to leverage hardware acceleration effectively.

Importance of Updated NVIDIA Drivers
Outdated drivers can lead to compatibility issues and suboptimal performance. Keep your NVIDIA drivers up to date to maximize GPU functionality and maintain compatibility with WSL 2. You can verify the driver version by running the following:
nvidia-smi
Using the latest drivers allows you to use the most recent CUDA features and avoid potential security vulnerabilities.
Afterward, here's the output:
Mon Feb 19 23:53:12 2025
+-----------------------------------------------------------------------------+
| NVIDIA-SMI 470.256.02 Driver Version: 470.256.02 CUDA Version: 11.4 |
|-------------------------------+----------------------+----------------------|
| GPU Name Persistence-M| Bus-Id Disp.A | Volatile Uncorr. ECC |
| Fan Temp Perf Pwr:Usage/Cap| Memory-Usage | GPU-Util Compute M. |
| | | MIG M. |
|===============================+======================+======================|
| 0 Tesla K80 Off | 00000000:00:1E.0 Off | 0 |
| N/A 46C P0 61W / 149W | 0MiB / 11441MiB | 93% Default |
| | | N/A |
+-------------------------------+----------------------+----------------------+
+-----------------------------------------------------------------------------+
| Processes: |
| GPU GI CI PID Type Process name GPU Memory |
| ID ID Usage |
|=============================================================================|
| No running processes found |
+-----------------------------------------------------------------------------+
Latest Version of the WSL 2 Linux Kernel
To check the latest version of the WSL 2 Linux kernel, read Microsoft’s official documentation. Always keep your kernel updated to maintain GPU compatibility and take advantage of new features. You can manually update WSL by running the following:
wsl --update
By updating the kernel, you can benefit from performance improvements and new capabilities added by Microsoft and NVIDIA.
What Happens When You Use --gpus=all Flag?
The --gpus=all flag in Docker explicitly assigns all available GPUs to the container.
docker run --rm --gpus=all tensorflow/tensorflow:latest-gpu python -c "import tensorflow as tf; print(tf.test.is_gpu_available())
This command guarantees that your container can access all GPUs, enabling GPU-accelerated workloads. If you want to allocate a specific GPU, you can use the following:
docker run --rm --gpus device=0 tensorflow/tensorflow:latest-gpu
How to Execute a Short Benchmark on Your GPU
After validating GPU support, you can execute a benchmark using the NVIDIA CUDA container.
docker run --rm -it --gpus=all nvcr.io/nvidia/k8s/cuda-sample:nbody nbody -gpu -benchmark
Afterward, the output should look like this:
Run "nbody -benchmark [-numbodies=<numBodies>]" to measure performance.
-fullscreen (run n-body simulation in fullscreen mode)
-fp64 (use double precision floating point values for simulation)
-hostmem (stores simulation data in host memory)
-benchmark (run benchmark to measure performance)
-numbodies=<N> (number of bodies (>= 1) to run in simulation)
-device=<d> (where d=0,1,2.... for the CUDA device to use)
-numdevices=<i> (where i=(number of CUDA devices > 0) to use for simulation)
-compare (compares simulation results running once on the default GPU and once on the CPU)
-cpu (run n-body simulation on the CPU)
-tipsy=<file.bin> (load a tipsy model file for simulation)

NOTE: The CUDA Samples are not meant for performance measurements. Results may vary when GPU Boost is enabled.

Windowed mode
Simulation data stored in video memory
Single precision floating point simulation
1 Devices used for simulation
MapSMtoCores for SM 7.5 is undefined. Default to use 64 Cores/SM
GPU Device 0: "GeForce RTX 2060 with Max-Q Design" with compute capability 7.5

Compute 7.5 CUDA device: [GeForce RTX 2060 with Max-Q Design]
30720 bodies, total time for 10 iterations: 69.280 ms
= 136.219 billion interactions per second
= 2724.379 single-precision GFLOP/s at 20 flops per interaction
This script runs a short benchmark to test GPU performance and make sure everything is working as expected. Benchmarks are particularly useful in identifying bottlenecks and verifying that your GPU is operating at peak efficiency.
Final Thoughts: Why Choose DevZero for GPU Workloads?
Enabling GPU support in Docker can significantly enhance your ability to run computationally intensive applications. Using the steps outlined in this guide, you can set up and validate GPU functionality in Docker. Whether you’re training machine learning models, running scientific simulations, or performing video processing, GPU acceleration can drastically improve performance and reduce processing times. Stay up to date on the latest Docker and NVIDIA advancements so you can enjoy the full potential of your GPU resources.
With DevZero, you can achieve true GPU sharing for efficient GPU resource management by allocating GPU power across multiple environments. With DevZero, developers can share GPUs simultaneously to make the most of their power, reduce costs by using GPUs only when needed, and easily manage large or small models with built-in storage tools.
If you’re building or scaling AI workloads, DevZero provides purpose-built infrastructure for AI and ML workloads, offering powerful tools like microVM-based isolation, GPU multiplexing with MIG, and secure networking. These capabilities are ideal for teams working on training and inference at scale.
To go deeper, see how DevZero leverages BlueField-3 DPUs and MIG technology to support secure GPU multi-tenancy across microVMs. This approach enables teams to share GPUs confidently without compromising performance or isolation—perfect for AI factories and high-density workloads.
Explore how DevZero can enhance your GPU-powered development workflow today.


